Tuesday 30 March 2010

Inside DVD cover New

I found this image from searching the internet for ideas for the inside cover for my DVD case. I downloaded this image into Photoshop and started to edit and adapt this image to make it my own work.
This is my new inside DVD cover. I have added new text to the background 'The Veronicas' so the audience are able to identify the inside of the DVD with the artist. I have used a feminine colour scheme of different shades of pinks and purple colours. I have added an effect to the original image to create a blurry paint effect to the image. I am pleased with my new inside DVD cover considering the time I had to create a new idea I think it looks very effective.

Front image of DVD cover

Here is the image I used for the front cover of my DVD and my magazine advert. I tried to create a similar image to my original image of The Veronicas sister that I had downloaded and used in my print products. I feel this image shows a good representation of The Veronicas sisters because of the clothes they are wearing and it shows their rock chic style.
Below are the images that I took to portray The Veronica sisters. Using Photoshop I had manipulated and edited the images to remove the background of both images and layer them both together to create a close relationship and bond between the artists.

creating an image for my dvd cover

Here is one of the images that I have used on the back of my DVD cover. I have edited the image so it looks like The Veronicas sisters are inside a designer store having their photograph taken.
I have created this image above my editing and manipulating images that I have taken to represent The Veronicas sisters. Below are the two images I have edited by removing the background and layering the artists side by side to create the image that the two artists are stood together. Once I had edited the two images of the girls I then positioned them on to the background image to create the final image.

Background Image

creating an image for my DVD cover

I created this image by editing and manipulating two separate images of the artists. I removed the backgrounds and layered the two girls together. Then I positioned them onto the background of a sweet shop. I achieved this image by using Photoshop and using the editing tools within the program.

Background Image

Creating an image for my DVD cover

I created this image using Photoshop. I included this image below on the back cover of my DVD. I created this image by editing two separate image of the two sisters by removing the background of each image and layering the two images of the sisters together. Next I pasted and positioned the image of The Veronicas on to the background which I found using the internet. I pasted this image on to my new DVD cover to show The Veronicas sister in different location and what the DVD will included and also the images help interest the audience into buying the DVD. Background Image


NEW DVD Cover, Magazine Advert

I had to make changes to my print products because I original used images that I had downloaded from The Veronicas website and when looking at the brief in detail I was not able to use these images within my print products. Below you can see the changes I have made to my new print products.

This is my new inside cover for my DVD. I have used bright feminine colours, using different shades of pink and purples to keep to my colour scheme which I have used throughout all of my print products. I feel I have achieved a very effective and funky background for the inside of my DVD case in the short time I had to create a new print product.
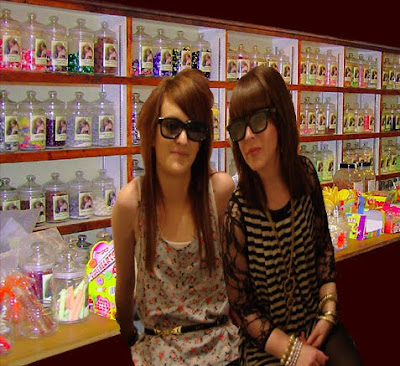
Here is my new magazine advert for my release of my DVD. I have replaced the image on the front of my magazine advert with an image I have created myself. I created this image by taking a variety of images of my actors who appeared in my music video as The Veronicas sisters. I used Photoshop to manipulate and edit the images to remove the background of the images and layer the images together to create a professional image which looks like the original image of The Veronicas sisters that I used in my first print product.
This is my new DVD cover. I have used my original DVD cover but I have removed the images that I downloaded from the Internet. I have created my own images using the actors that appeared in my music video to represent The Veronicas sister. I have manipulated and edited my images using Photoshop to create a professional images which look similar to my original images that I used.

Monday 29 March 2010

Creating my DVD cover & Inside


I started by creating a sketch for my DVD cover this gave me initials idea of the layout of my DVD cover and what to include in my DVD design. I found an image at www.theveronicas.com which I thought would be appropriate for the front cover of my DVD of The Veronicas which is shown at the left. I also search Google for a black and white checked image which I used for my background of the DVD cover. I adjusted my squared background to an average size of a DVD, then I cut around the image of The Veronicas using a tool in Photoshop and pasted in on to my Black and white background. I arrange the image on my background to the right side of the DVD, I stretched the image size to fill most of the front cover of my DVD. I added the title of the DVD ‘The Veronicas – Live Experience’ using bright pink text. I formed a glow around the outside of the word ‘The Veronicas’ to make the name of the artists stand out. I created a spine for the DVD which I included the DVD logo that I downloaded from the internet. I used the image that is on the front of the DVD and adjusted the size so it would fit in the spine. I copied the title of the DVD and made it smaller so it would fit along the spine of the DVD. I downloaded an image of a barcode from the internet and pasted it on to the back of my DVD cover. I started to create a track list of the songs included on the DVD for the viewers to look at. Below is my first attempt of creating my DVD cover.

I added a small paragraph to the back of my DVD cover to explain and interest the viewers about my DVD also I included a short sentence about special features that would be available on my DVD. I used another image which I added to the back of the DVD cover as there was a lot of blank space, I feel this made the back cover look more exciting. I moved the position of the barcode so I could fit the large image on to the back of my DVD, the barcode wasn’t very clear on top of the image so I moved it across on to the background. Below is my second attempt at my DVD cover.

Here is my final DVD cover. I feel that this is a very professional print product and that it has been finished to a high standard of work. I think that it meets the target audience and attracts the viewer’s attention by the use of the bright pink text and black and white background. I have included the Warner Bros Record company logo and the age classification logo. When researching into print products and promotion packaging I found that all DVD’s must include an age restriction certificate and company logos.


I also created the inside cover for my DVD. I did this by downloaded images of The Veronica sister’s from their official website. I then cut and pasted the images on to a new page which I adjusted the size of the page layout to fit the size of an actual DVD cover. The four images below are the images I used to create the inside cover.

This image is the centre of my inside DVD cover.

I cut this image in half between the two sisters and put them either side of the middle image.

I cut this image in half betwen the two sisters and put them either side of the second image.

I cut this image in half between the two sisters and put them at either side at the end of the cover.


Below is my finished inside cover for my DVD, I think that this look was very simple and easy to create. It gives a very dramatic and interesting image of The Veronicas.